Please make sure to read the Getting Started and Download and Setup sections โ€” they cover a lot of the basics.

Subscription

See the Subscription and Pricing information page for full details.

Use the Pricing or Buy Subscription link in the left navigation bar.

Use My Account or the 'Dashboard / Account' link in the left navigation bar.

You can have up to 3 members of the same household (primary user + 2 family members) use the same subscription at no extra cost. They can use different computers and logins, but must reside in the same household.

Use this form or the 'Support / Family Subscription' link in the left navigation bar. Please make sure that a BigRingVR account with the email address of your family member is created before submitting a request โ€” we cannot add an account to your subscription if it does not yet exist.

Major credit cards and PayPal. Payment with BigRingVR is always 100% secure. We encrypt your data with an SSL connection and never save credit card details.

Go to My Account or the 'Dashboard / Account' link in the left navigation bar and click the Cancel Subscription button.

No problem! You can continue to use BigRingVR until the end of your current billing period. Use My Account or the 'Dashboard / Account' link in the left navigation bar to see your subscription details.

No, it will be charged automatically each month.

Unfortunately, subscriptions cannot be paused. The best way to "pause" is to cancel once you no longer need it, then purchase a new subscription when you want to use BigRingVR again.

No, a subscription is only required for streaming web rides.

No, you will need a subscription to stream in real-time or to use downloaded rides.

Yes โ€” you can upgrade from Monthly to 6-Month or Annual, or from 6-Month to Annual, directly from your My Account page. The upgrade takes effect immediately and you are only charged the difference for the remaining days on your current plan. For example, if you switch to Annual with two weeks left on your monthly plan, those two weeks are credited and you pay the annual fee minus that amount. Your billing cycle restarts from the day you upgrade.

Yes! Visit the Gift Subscription page to purchase a voucher for any number of months. You will receive a voucher code by email that the recipient can redeem at bigringvr.com/redeem. The recipient must have a BigRingVR account before they can redeem the voucher โ€” if they don't have one yet, they can create a free account in a couple of minutes.

Account and Trial

Yes, try it free for 14 days โ€” no credit card required. Sign up here.
The trial starts when you create a BigRingVR account. If you signed up but didn't have a chance to ride during the trial window, please send us an email and we can extend it.

Make sure you create a BigRingVR account on the website before trying to sign in to the application. It only takes a couple of minutes.

This may be because you have cookies disabled (required by Google) or are using an ad blocker. We don't have any ads on our website, so temporarily disabling the ad blocker or enabling cookies should fix the problem.

Video, Download and Streaming

That depends a lot on your hardware and internet connection speed. We stream in 1080p and 720p quality โ€” if your setup can handle the higher resolution and internet stream, you will get 1080p quality. More information can be found here. Also check out some of our demo videos, with many more coming.

We recommend starting with 720p. If your computer hardware meets the recommended requirements, use 1080p for the best video quality. If your video stops or starts stuttering, switch to 720p.

A better option is to run the automatic test to determine the optimal video quality setting (Preferences / User Profile / Determine Web ride settings). It will test both internet connection speed and GPU performance and set the best options for you.

If your internet connection is fast enough for real-time streaming, there is no need to download the ride.

If your internet connection is not fast enough and you are getting "download buffer low" messages during live streaming, try the download option. Another reason to download is if you want to ride 1080p videos but your connection is only fast enough for 720p โ€” make sure to select the 1080p option before downloading.

Click the checkbox 'Only show downloaded rides' in the top-left corner of the app.

Running the Application

Most likely โ€” we support a wide range of trainers.

If your trainer supports the ANT+ FE-C protocol, it will work with the BigRingVR app.

Currently we support only ANT+. We plan to introduce Bluetooth support in a future release.

To find out what CPU you have:

1. Right-click on the Windows Start menu icon.
2. Click on System in the menu that appears.
3. Next to Processor, it will list your CPU model.
4. Check this Intel link to find the generation of your CPU.

TCX files are saved in the Big-Ring\Rides folder under your Documents folder.

The Tacx Genius T2021 is not a Tacx Genius Smart โ€” it is one of the older models. It communicates with computer software using a proprietary, secret protocol rather than ANT+ FE-C (the ANT+ trainer standard). This means it cannot be used with BigRingVR.

Yes. The Kickr Climb is controlled by the Kickr, not by BigRingVR. The app sends the slope to the Kickr, which then sends it to the Climb.

Yes, we support it on rides that have a surface different from normal asphalt. To enable this feature, select 'Enable TACX Road Feel' in Preferences / Smart Trainer. You can experience this on rides with cobbles or gravel, such as St. Gotthard Pass and Tour of Flanders (Part 1), among others.

It is very easy to create a custom course. On the main app screen, pick a ride then click the Create a new course button above the elevation profile. Drag the sliders to select your portion, give your custom course a name, and click Save. You will then see both the complete course and your custom course in the courses box.

Yes. In Preferences, create an ANT+ configuration that uses your trainer as a power meter but not as a controllable smart trainer. When creating the configuration, set the smart trainer to "Don't use" and set the power meter to the power channel of the smart trainer.

Yes, but only for loop rides โ€” look for rides with "Loop" in the name (there are about 20). After selecting a loop ride, check the Ride Multiple Laps option in the top-left corner. To set this as the default, check 'Ride Multiple Laps for loop rides' in Preferences / General.

Setting "Trainer Difficulty" lower than 100% will decrease resistance on climbs. For instance, at 50% a grade of 10% is communicated to the trainer as 5%. BigRingVR's speed calculations still use the original grades, so it will not make you faster โ€” you can think of it as virtual low gears. The default setting is 100%.

If Garmin or Suunto applications (Garmin Express, Suunto Movescount, etc.) are running in the background, they may block USB port and ANT+ communication. Closing them should resolve the issue. If that does not help, remove and re-insert the ANT+ USB stick to reset the ANT+ channel.

Unlike Windows 10, Windows 11 does not automatically install proper ANT+ drivers. You can find and install them here.

This issue may have several causes:

1. The ANT+ dongle you are using is not compatible with BigRingVR. We are aware of two brands โ€” Anself and Cycplus โ€” that are problematic because they do not support the complete ANT standard. You can read more here.
2. Another program may be occupying the dongle. Make sure all programs that might be using it (e.g. Garmin Express, Zwift) are closed.
3. The USB port the dongle is in may not provide enough power โ€” try a different USB port.

Not all BKool trainers have ANT+ FE-C enabled by default, which is required for BigRingVR. You can use the BKool software to check and enable ANT+ FE-C if necessary โ€” see this support article for more information.

Some anti-virus applications may cause this error. Temporarily disabling them should resolve the issue. Google sign-in only needs to be done once, so there should be no issue for subsequent sign-ins when your anti-virus is re-enabled.

Yes, but not all. Some RLV publishers (e.g. TACX) encrypt their control files, so they cannot be used in BigRingVR. If your RLV comes with a GPX, RLV, or PGMF file, it can be used. Note that only rides with GPX files have GPS data and will show correctly on the map when uploaded to Strava โ€” others will only show ride metrics without a map. The location of your local rides can be configured in Preferences / Videos.

You can use a phone app that mimics a Bluetooth mouse and keyboard, for example Serverless Bluetooth Keyboard.

When your activity is saved, we look at your 20-minute maximum power ร— 0.95. If this number is higher than your existing FTP, we update it.

No, but you can use this workaround:
1. Download the ride.
2. Log in to the app while you have an internet connection (login is valid for 24 hours).
3. You can then use the app completely offline to ride the downloaded ride for up to 24 hours.

This is a privacy feature that prevents others from riding against your previous efforts or riding with you in real-time. You can change this setting in Preferences at the bottom of the Account page. When activity sharing is on:

1. Other people will be able to ride against / with your efforts.
2. You will be able to ride against / with efforts of others.
3. You will be able to ride together with others in a live ride.

Currently we do not offer this functionality. You can share your rides with others by posting your RLV on an internet storage site and allowing them to download it to their hard drive. It can then be run locally in BigRingVR.

For GPX files, please make sure that:
1. The video file and control file have the same name, except for their extension (e.g. my_local_ride.mp4 and my_local_ride.gpx).
2. Supported codecs are H.264 and H.265; supported containers are MP4 and AVI.
3. The control file must be a GPX, RLV, or PGMF file.
4. The GPX file must contain a track, and each track point must include a timestamp.
5. The GPX track and video file must start at the same location so the video and GPS track are in sync.

Link your Strava or TrainingPeaks account in Preferences / Integrations. When your ride is saved, it will be automatically uploaded to your linked accounts.

Yes. Configure 'Download location' in Preferences / Video to point to your external drive. Make sure your external drive is always mounted with the same drive letter (e.g. drive F) that you have configured.

Screenshots are saved in the Big-Ring\Screenshots folder under your Documents folder. Unfortunately, we cannot automatically upload them to Strava, as Strava does not offer that capability in their public API. To add images to your Strava ride: open your ride in Strava, click 'Edit Activity', then drag images to the Photos section.

To join a challenge, simply complete one of the rides in the challenge. Your result will automatically be added to the challenge leaderboard.

Not yet, but you can use the scheduled rides feature. Add rides to your schedule (click the bell icon) on the Challenge page. In the app, choose 'My scheduled rides' from the 'Show' dropdown. Once you complete a ride, it is automatically removed from your schedule, giving you a clear picture of which rides remain.

Unfortunately, no. A ride will appear on the leaderboard and be marked as completed only if it is done as a full ride in a single attempt.

When you ride multiple laps of a loop ride, it will not appear on the leaderboard. To disable the 'Multiple Laps' option, uncheck 'Ride Multiple Laps' in the top-left corner after selecting a ride. To configure this as the default, use the 'Ride Multiple Laps for loop rides' option in Preferences / General.

Using the Website

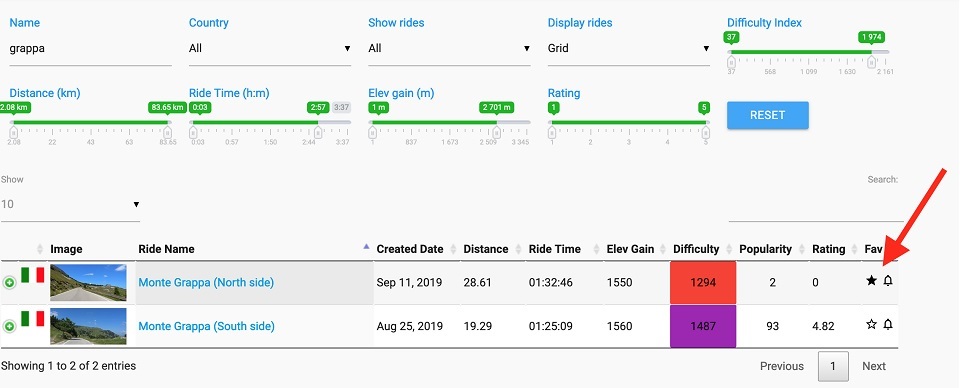
You can add rides to scheduled / favorites on the rides page. Make sure you are logged in โ€” in the rightmost column, click the Star icon (favorite) or Bell icon (scheduled).

You can also add rides to scheduled / favorites on the individual Ride page.

Favorite and scheduled icons

To filter your favorite or scheduled rides in the app, use the 'Show' dropdown in the top-left corner of the main screen.

Use the 'Dashboard / My Rides' link in the left navigation bar, or go directly to My Rides. Click on the Date link to see details of an individual activity.

Navigate to My Rides. In the rightmost column you can delete an activity permanently (click the delete icon) or make it private (click the lock icon), so it won't appear on the ride leaderboard. Please note that once an activity is deleted, there is no way to restore it. You can, however, toggle your activity between private and public at any time.

Go to My Account or the 'Dashboard / Account' link in the left navigation bar, select the Settings tab, and turn individual notification options on or off. If you want to use an alternative email address for notifications rather than your main Google account email, you can add it in the Settings tab.

Support

Please join our public BigRingVR Group on Facebook. Connect with fellow BigRingers, share and learn, and get help from fellow cyclists!

Join our public BigRingVR Group on Facebook to get help from fellow riders.
If you come across any issues, please report them here.
You can also contact us by email.
We would highly appreciate your Feedback.