Running the App
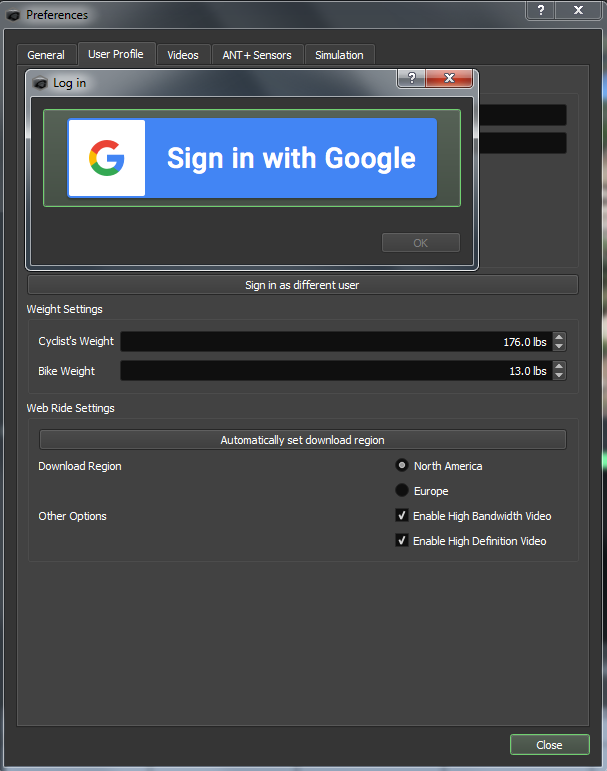
Sign in with Google Account
The first time you run BigRingVR, you'll need to sign in with your Google account. This only needs to be done once — all future sign-ins will happen automatically. Before signing in from the app, make sure you've created an online BigRingVR account using Google sign-in, or you may encounter an error.
Configuration
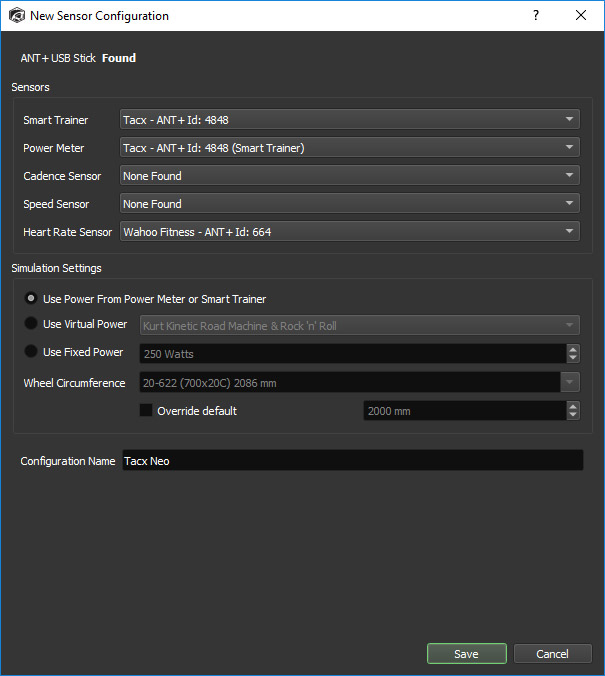
Configure ANT+ Sensors
Next, configure your sensors. Go to the ANT+ Sensors tab and click the New Configuration button. You'll have two options for setting up your trainer:
- Use Power from Power Meter or Smart Trainer — When pairing your smart trainer, we recommend selecting Smart Trainer from the dropdown instead of performing a full sensor search.
- Use Virtual Power — Select your trainer from the dropdown list; your power will be calculated based on the manufacturer's published power curve data. If your trainer is not listed, please let us know so we can contact the manufacturer for accurate power curve data. In the meantime, you can use the Generic Fluid or Generic Magnetic option. If you have an ANT+ speed sensor, choose this option and select Generic Fluid or Generic Magnetic as your trainer.
Name your configuration, for example, "TACX Neo." BigRingVR will automatically search for and pair with your trainer or sensors. Press Save to store your configuration. You can set up multiple profiles — for example, one linked to a smart trainer and another linked to a power meter.
Configure User Profile
On the User Profile tab you can set your weight and bike weight, as well as Web Ride settings. Make sure to pick the Download Region that is closest to you.
If your computer hardware meets the recommended requirements, select 1080p for the best video quality. If you are not sure, give it a try and see if your PC can handle the best setting. If your video stops or starts stuttering during the ride, switch to the 720p option.
A better option is to run the automatic test to determine the optimal video quality setting (click the Determine Web ride settings button). It will test both internet connection speed and GPU performance and will set the best options for you.
Smart Trainer Settings
These settings only apply to smart trainers. Speed calculation is not affected by these settings — only the brake force applied by the smart trainer. These are very powerful settings to enhance your riding experience. Keep them at maximum values (±25%) for the most realistic terrain experience.
If you want to do intervals, you might want to set Maximum uphill to 4–5%. This way you won't need to shift gears when grades change and can focus on your interval power instead. Video speed is still calculated based on the power you produce, so it won't affect the realism of the ride. Triathletes will find this feature very helpful as it opens up many steep climbs for training. It's also great for recovery rides.
Setting Trainer Difficulty lower than 100% will decrease resistance on climbs and increase it on downhills proportionally. For example, if you set it to 50%, a grade of 10% will be communicated to the trainer as 5%. BigRingVR's speed calculations will still use the original grades, so it will not make you faster — you can think of it as virtual low gears. The default setting in BigRingVR is 100%.
Simulation
If you live and train at elevation but want to correct your power output to sea level, you can adjust the elevation power correction percentage setting. This creates a fair playing field for athletes riding virtually at elevation compared to athletes at sea level.
For example, if an athlete rides at an elevation of 2,100 meters (7,000 feet), the suggested "elevation power correction" setting is 9% — so if the athlete generates 250 W, speed will be calculated based on 272 W (250 W × 1.09). Power will still be displayed and saved as 250 W; only speed is affected. Rides with elevation correction will be marked with an asterisk on the BigRingVR leaderboard.
More information on FTP in relation to altitude can be found in this excellent post by Joe Friel.
Integrations
You can link your Strava or TrainingPeaks account so that when a ride is saved it will be automatically uploaded to your linked accounts.
Let's Ride
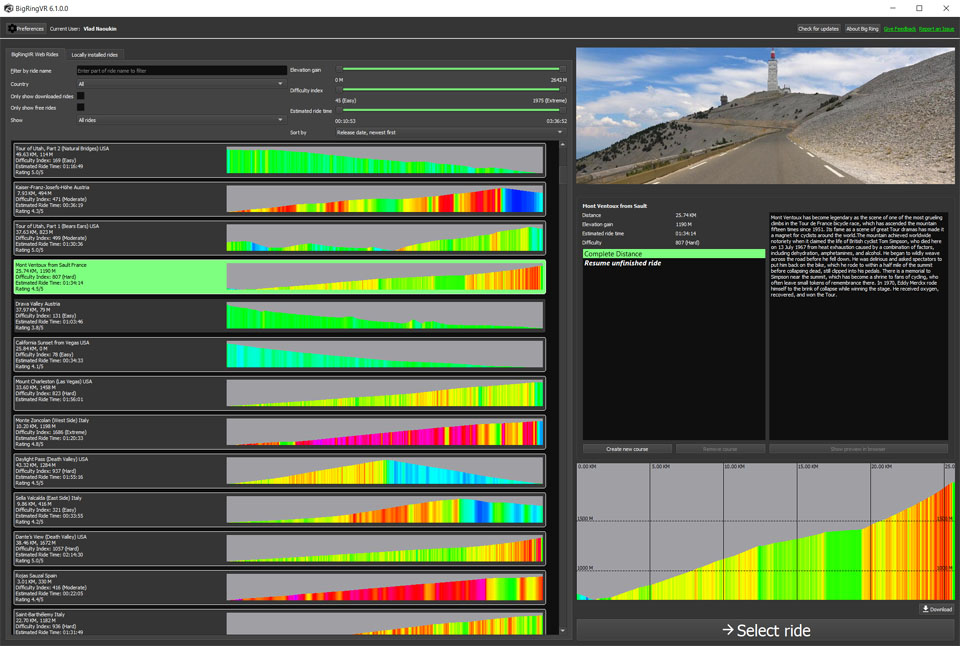
If you know the name of the ride, enter it in the filter text box in the top-left corner. You don't need to enter the exact name — typing "Alp" will find "Alpe d'Huez" and any other matching rides. To make finding rides easier, you can filter by Country, Elevation Gain, Difficulty (FIETS), and Estimated Ride Time. Rides can also be sorted by Ride Name, Difficulty, Estimated Ride Time, Elevation Gain, Rating, and Popularity. Pick a ride in the left panel, review the ride profile on the right, then click Select Ride. If you only want to ride part of the course, use the Create New Course button to customize and save a start and finish point.
If you have a good internet connection (2 Mbps+), there is no need to download the ride — simply click the Select Ride button. We strongly recommend trying live streaming before downloading, as it gives you many more ride options.
If your internet connection is not fast enough and you are getting "download buffer low" messages during the live stream, try the Download Video option. Click Download Video, wait for the download to finish, then click Select Ride to proceed. Once the video is downloaded, the Download Video button becomes Delete Video — please use this to free up space when you are ready to download a new ride. During the trial period you can download 1 ride at a time; with a subscription the download limit increases to 30.
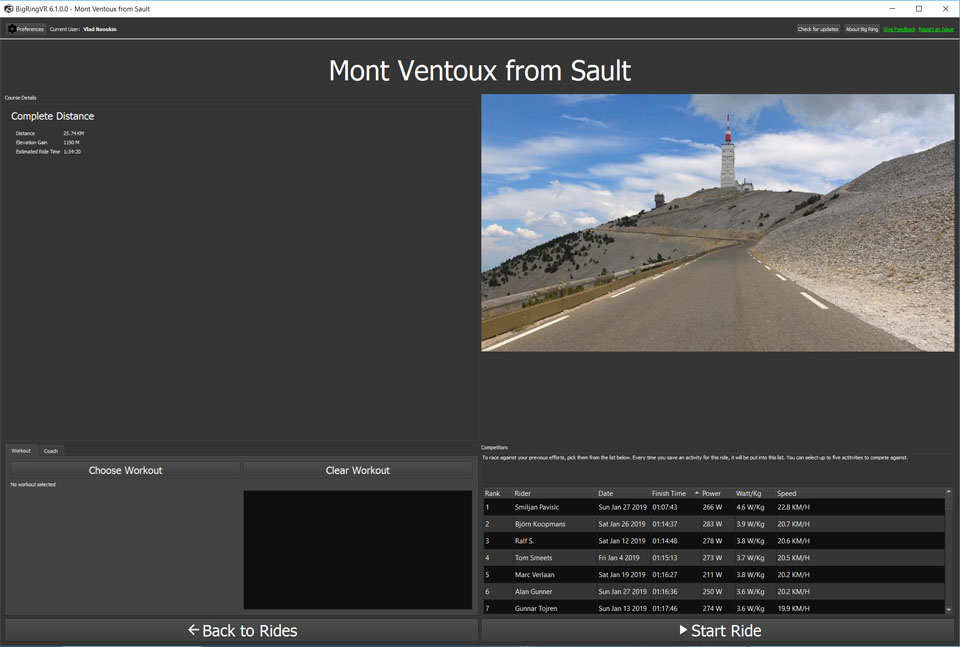
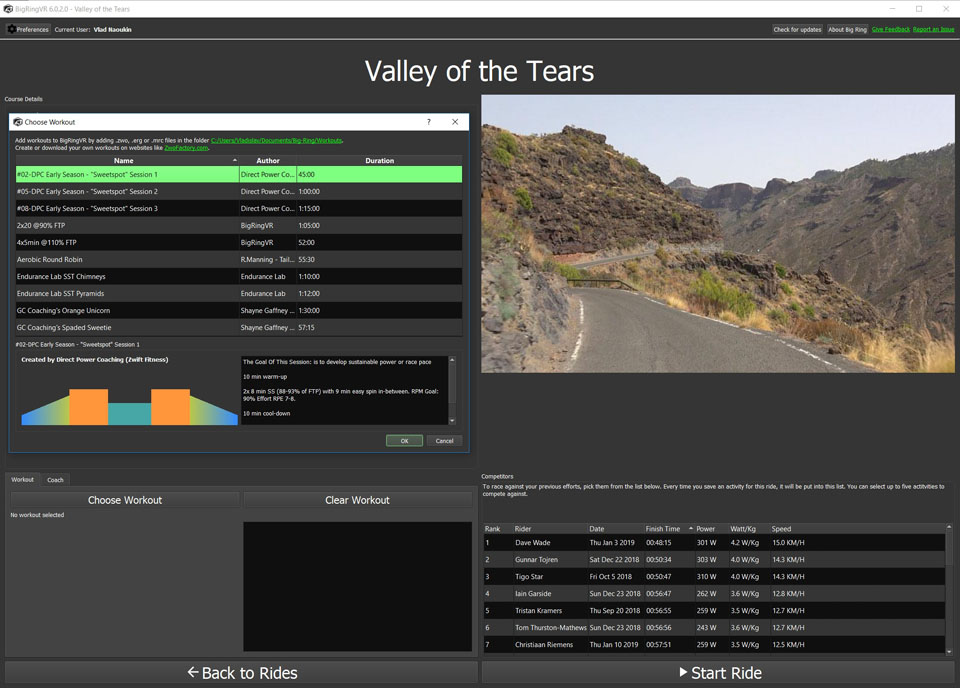
To race against your previous efforts or other riders, pick them from the Activities list. Every time you save an activity for a ride, it will be added to the Activities list. You can select up to five activities to compete against. If you want to race against other riders, make sure to check Enable Activity Sharing in Preferences / User Profile (enabled by default) — if this option is off, you will only see your own efforts. Click Start to ride.
On this screen you can also choose a workout (see below) or the Coach option. The Coach functionality helps you pace your ride — set your Coach at a specific power level and you'll see it as a marker on the profile and in the competitor grid. Just stay with the Coach to maintain your target power. You can increase or decrease Coach power during the ride using the shortcuts listed below.
Keyboard Shortcuts
| Key | Action |
|---|---|
| E | Turn on / off ERG Mode |
| ↑ | Increase target ERG power |
| ↓ | Decrease target ERG power |
| C | Turn on / off Coach |
| Q or = | Increase Coach power |
| A or - | Decrease Coach power |
| F | Enter / exit full-screen mode |
| S | Take a screenshot of your ride |
| Key | Action |
|---|---|
| V | Cycle profile and metrics panel display |
| P | Cycle profile: full / zoomed-in / split |
| R | Turn on / off Ranking Screen |
| M | Turn on / off Map view |
| Esc | End / pause the ride |
| Space | Mark a lap |
| L | Show lap stats (great for intervals) |
To end the ride, press Esc. You will have the option to save a TCX file of your ride so it can be uploaded to your favorite sports website — the save location is configured in the General tab. If you have linked your Strava account, your ride will be automatically uploaded. There is also an option to rate the ride and add it to favorites, which helps our community find the best rides and allows us to provide you with personalized recommendations.

Workouts
Workouts are currently supported for smart trainers only in ERG mode. After selecting a ride, click the
Choose Workout button to select an ERG mode workout. Workouts are provided by BigRingVR and can also be imported from
.ZWO, .ERG, and .MRC files — to add workouts, place them in the
Documents\Big-Ring\Workouts folder. To get more workouts or create your own custom workouts, please visit
Zwofactory.
Custom user training plans can be found here.
During a workout you can increase or decrease the target power by 2% using the ↑ / ↓ keys. To skip an interval, press Tab.