Download BigRingVR
Current Version — BigRingVR 8
BigRingVR 8 is a free download for Windows and Mac — the Mac build is universal (native on Apple Silicon and Intel), and the app keeps itself up to date automatically after installation. Not sure your computer is supported? See the system requirements.
Windows
Download the BigRingVR installer and double-click the downloaded file to begin installation. Follow the on-screen instructions to complete the setup. For details on running BigRingVR, please see the Using BigRingVR page.
Windows DownloadApple Mac
Double-click on the disk image. When Finder opens, double-click the application icon to launch it, or drag it to your Applications folder. For details on running BigRingVR, please see the Using BigRingVR page.
Apple DownloadOlder Version — BigRingVR 7 (for older hardware)
BigRingVR 7 (64-bit): Windows · macOS
BigRingVR 7 (32-bit): Windows (32-bit)
Even older
Version 6.16: Windows · macOS (macOS Sierra 10.12 or higher).
Setup
Installing
Download the installer and run it, following the on-screen instructions. On Windows the installer is digitally signed (Microsoft Trusted Signing); if SmartScreen shows an “unrecognized app” notice on this first install, click More info → Run anyway. After that, the app updates itself automatically — no more installers.
Smart App Control has no “allow this one app” option, so the only way past it is to switch it off: Windows Security → App & browser control → Smart App Control settings → Off.
One thing to know: Smart App Control is a one-way setting — Windows doesn't offer a way to switch it back on later. Everything else carries on as normal: Microsoft Defender, SmartScreen and the firewall are all unaffected.
Connecting your trainer and sensors
BigRingVR 8 connects to trainers and sensors over Bluetooth or ANT+ — or a mix of both. Bluetooth needs no extra hardware or drivers: just pair from the app's sensor screen. ANT+ needs a USB dongle (below).
ANT+ USB Stick (Windows and Mac)
ANT+ works on Mac as well as Windows — the same USB stick, and nothing to install. Plug it in, then add your sensors from Preferences → Sensors → Add Sensor. The driver steps below apply to Windows only.
To use BigRingVR with ANT+ sensors, you will need an ANT+ USB stick (e.g. Garmin). Please note that the Cycplus dongle will not work with BigRingVR because it does not support the complete ANT standard.
If you have already used this ANT+ stick with other programs like Zwift or TrainerRoad, you already have the correct driver installed.
To install the driver, simply insert the stick into a USB port on your computer. After a few seconds, Windows 10 will start to download and install the driver automatically. Wait for this to complete before continuing.
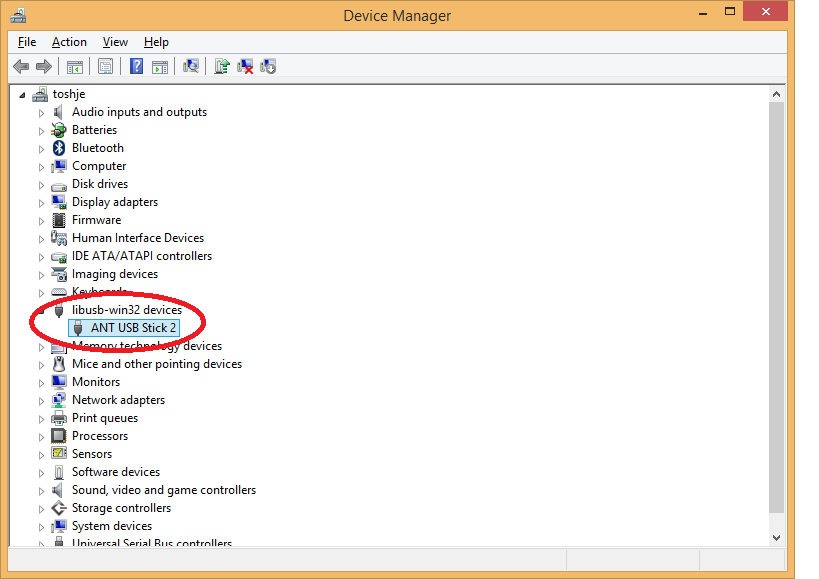
When opening Control Panel → Device Manager, you will see the device listed as shown below:
After downloading, see:
Using BigRingVR